I’ve received many requests for information on how to perform some DIY maintenance on the Pulsar 200NS. In this Bajaj Pulsar 200NS DIY Maintenance Guide, you’ll learn the following:
Fuel tank cover removal.
Fuel tank removal.
Air filter replacement.
Coolant replacement.
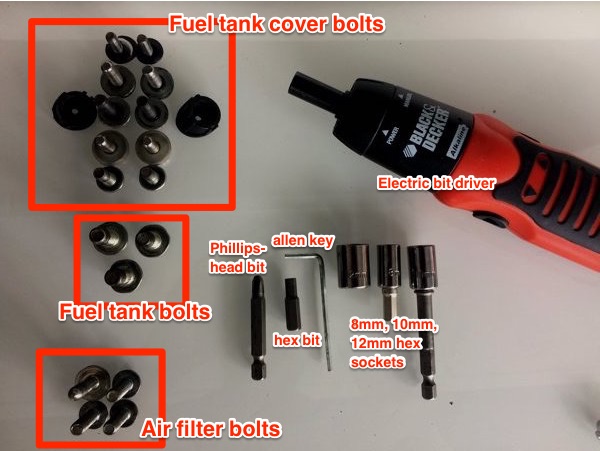
Some of the tools required:
8mm, 10mm and 12mm hex sockets
Hex bit set
Phillips-head (+ shaped) screwdriver
Long-nose pliers
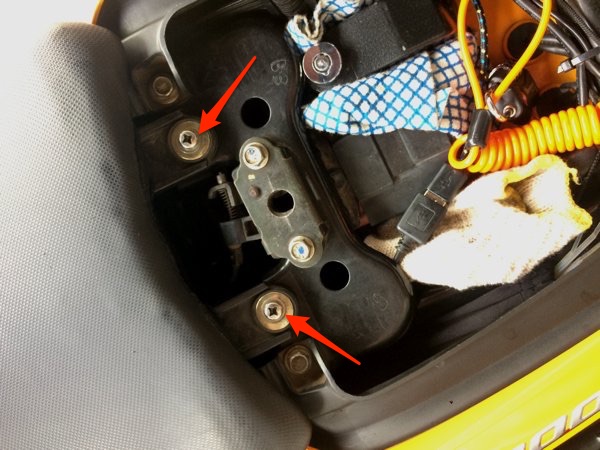
REAR AND MAIN SEAT REMOVAL
First, remove the pillion seat.Unscrew the 2 bolts and remove the main seat. Your bolts may look different from this as I’ve replaced them with stainless steel phillip-head bolts.
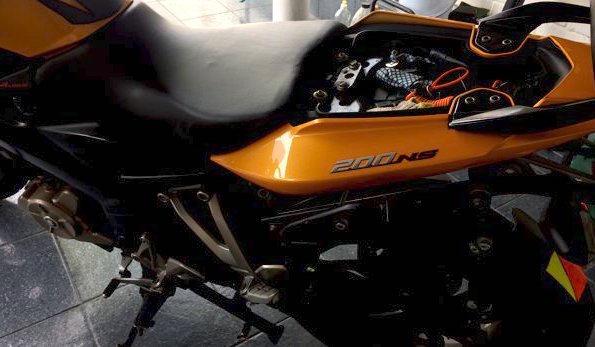
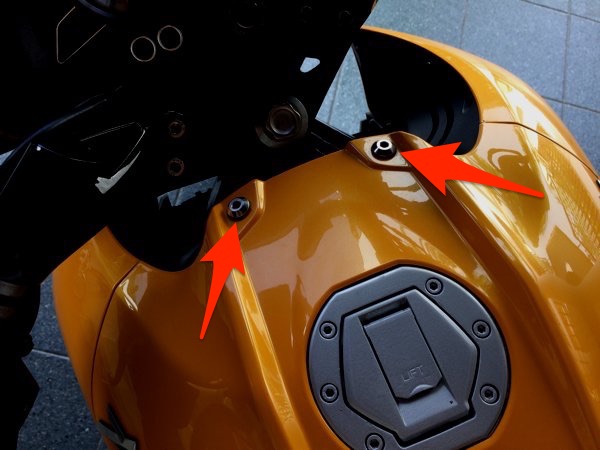
FUEL TANK COVER REMOVAL
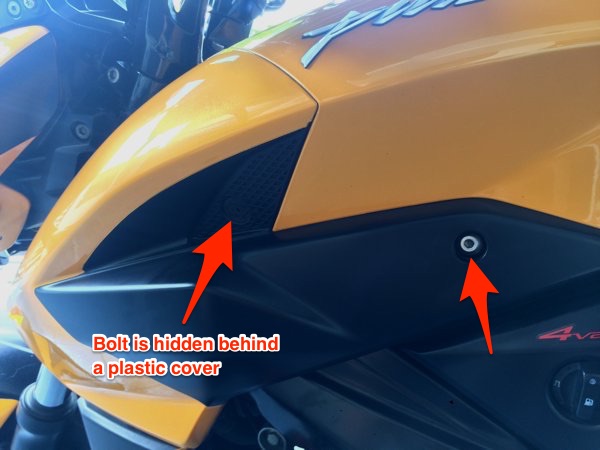
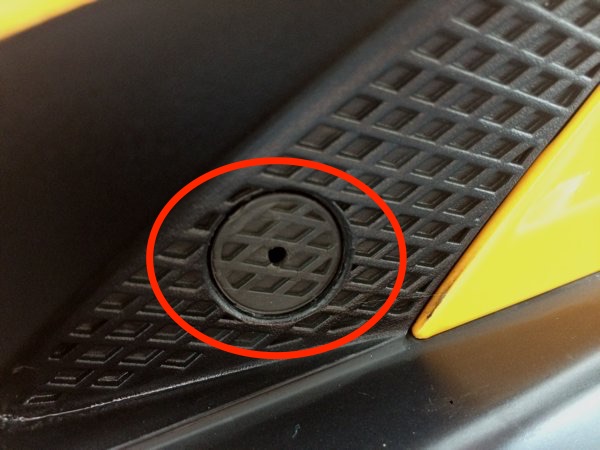
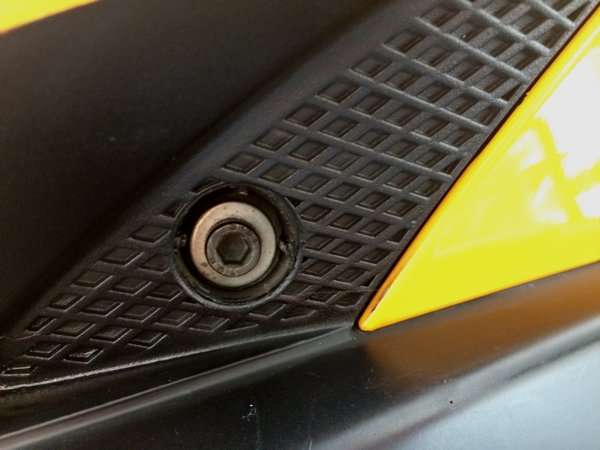
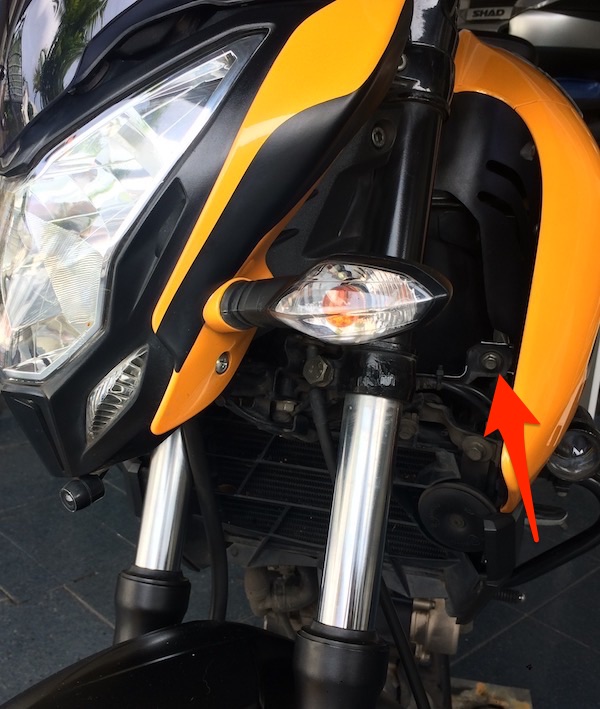
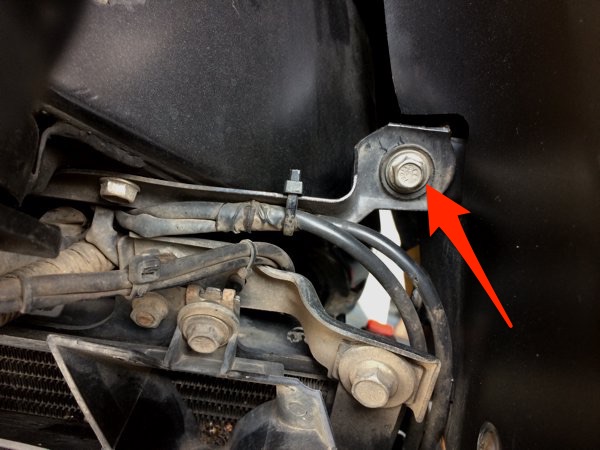
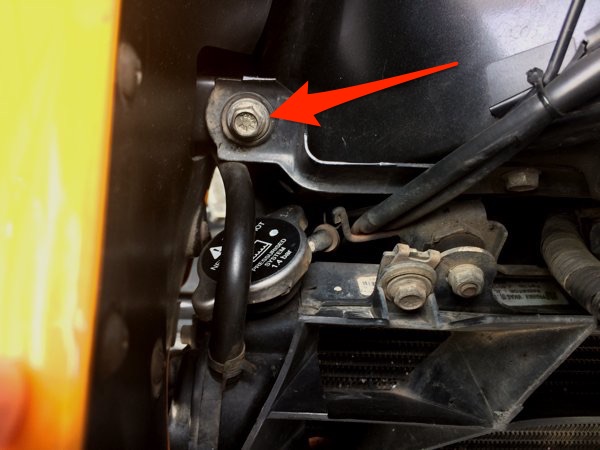
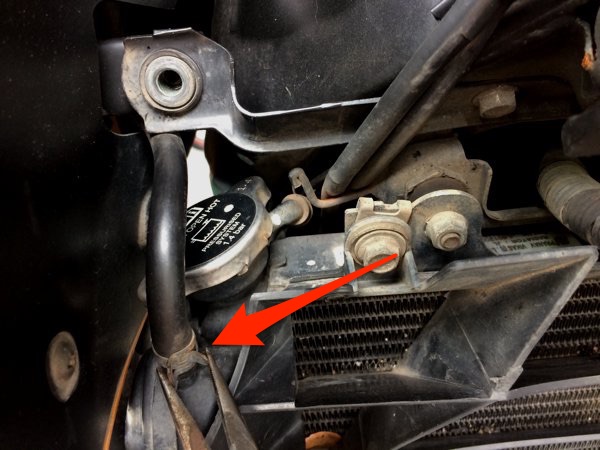
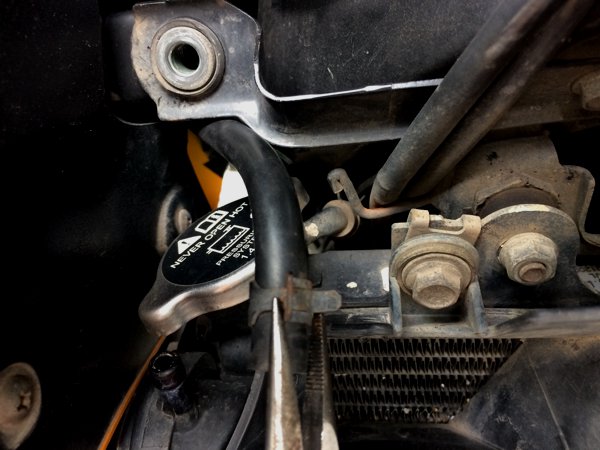
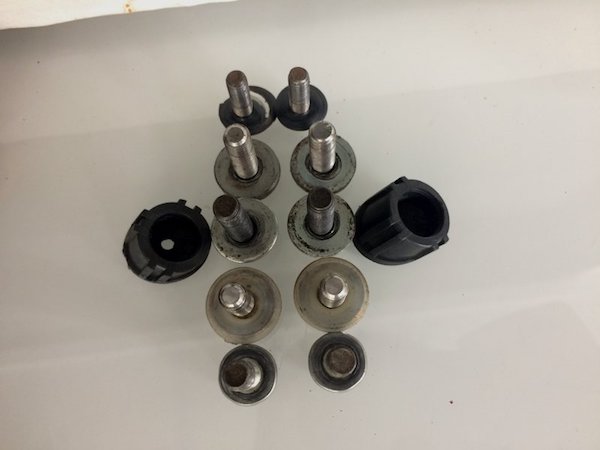
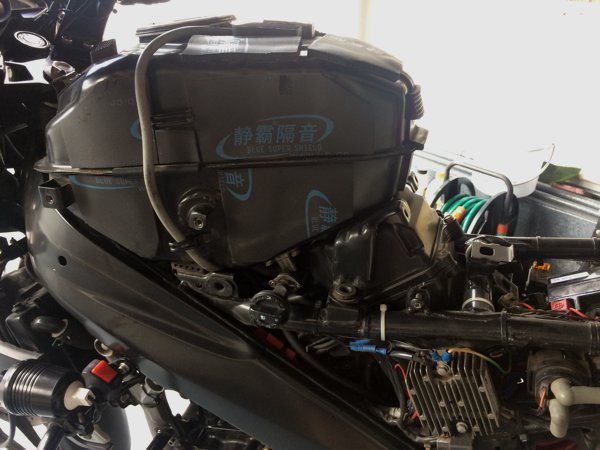
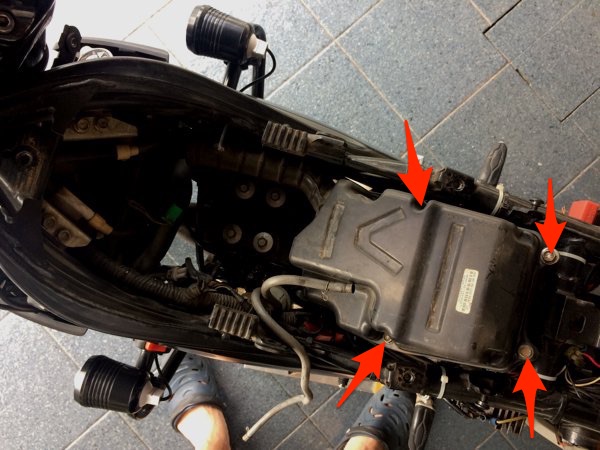
Remove these 2 bolts on the fuel tank cover.Remove these 2 bolts at the top of the fuel tank cover.Remove these 4 bolts (2 from each side). Note that 2 bolts are covered by plastic trim pieces. You’ll need to pry them out – don’t worry, they’re quire rubbery and won’t break easily.Use a small tool to pry this plastic trim out. I use a small allen key for this job – insert through the hole in the middle and pry.Once you remove the plastic trim, you should see the exposed bolt. Remove this bolt (one on each side).Next, remove 2 bolts (left and right side each) securing the fuel tank cover from the front of the motorcycle.Closeup of the fuel tank cover front bolt. This is the bolt on the LEFT hand side of the motorcycle. Make sure you remove the correct bolt – this one holds the fuel tank cover and the other one holds the radiator.The fuel tank cover front bolt – this is the bolt on the RIGHT hand side of the motorcycle (which would appear LEFT when viewing from the FRONT of the bike).From the same area, use a pair of needle-nosed pliers to release the clamp and remove the coolant overflow hose. Don’t worry – no (or very, very little) coolant will flow out from here.Coolant overflow hose removed. See? Zero coolant leak!I may be a bit of an OCD, but I like to arrange the removed bolts so that I know how they go back in later. Make sure you have these 10 bolts removed from the fuel tank cover before attempting to lift up the fiberglass piece.Now go ahead and remove the fiberglass fuel tank cover by lifting it up completely. There will be a dangling coolant overflow hose. Do not bother about it, just leave it attached to the tank cover – you will be able to pull out the whole cover and expose the underlying fuel tank. Your fuel tank may look slightly different from mine as I’ve added sound dampening material on my fuel tank to reduce vibrations on the bike.
FUEL TANK REMOVAL
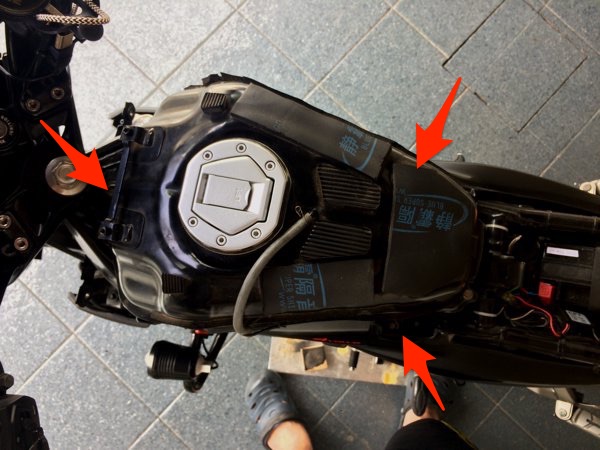
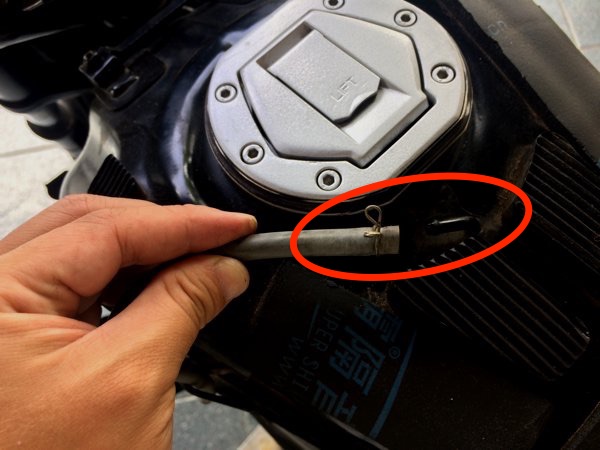
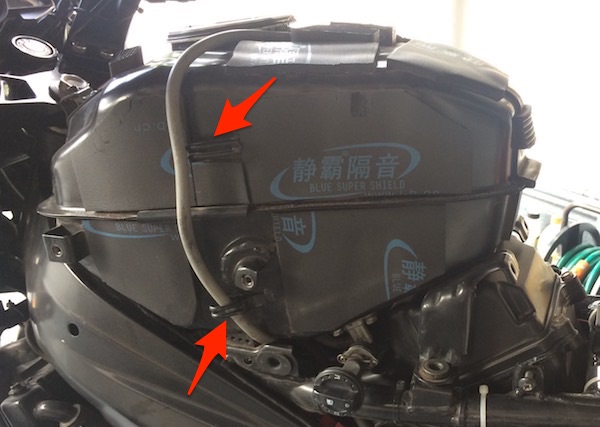
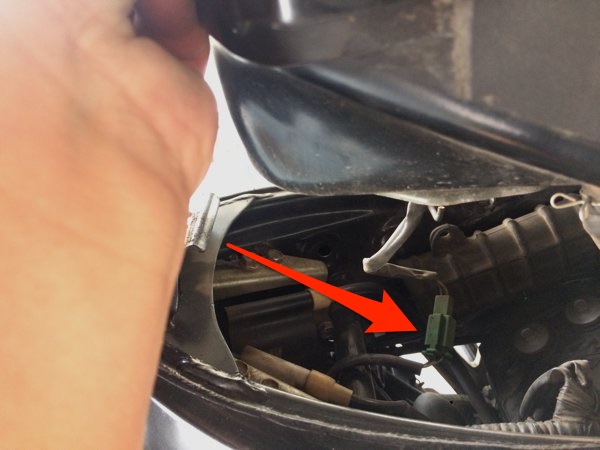
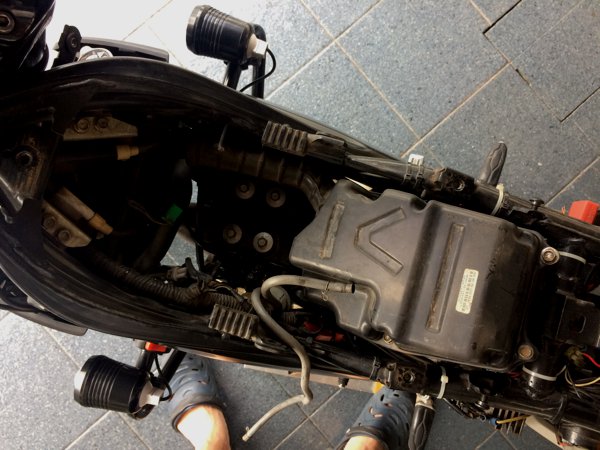
Before you go further, TURN OFF your fuel petcock valve. You definitely don’t want flammable fuel gushing out onto the ground!Next, remove the side panel fairings by removing 2 bolts and then pulling the plastic fairing out. It is sufficient to remove just the LEFT side fairing, but I prefer to remove BOTH left and right ones just for easier access.Your bike should now look like this – an even more naked version of a naked bike.Remove the 3 bolts securing the fuel tank to the bike frame.Disconnect the fuel breather hose from the top of the fuel tank.Release the breather hose from the fuel tank by removing it from the 2 clips on the LEFT hand side of the fuel tank that holds the breather tube down. Note that a little fuel will leak from the hose if you lower it – so try to keep the hose pointed up.Gently lift up the fuel tank a little. You should see the fuel hose connected to the petcock valve. Make sure that the valve is TURNED OFF, then disconnect this fuel hose. Note that a little bit of fuel will drip out from this short hose when you disconnect it. But if your fuel petcock is not turned off properly, A LOT of fuel will gush out from your fuel tank!Gently lift up the FRONT of the fuel tank slightly and you will find the fuel level sensor wiring. Disconnect this molex connector.Once you’ve disconnected everything mentioned above, go ahead and lift up the fuel tank and remove it from the bike. There WILL be a fuel overflow hose dangling – don’t worry about it. There will also be a short piece of electrical wire dangling from the bottom of the fuel tank – that’s the fuel level sensor wiring.
AIR FILTER REPLACEMENT
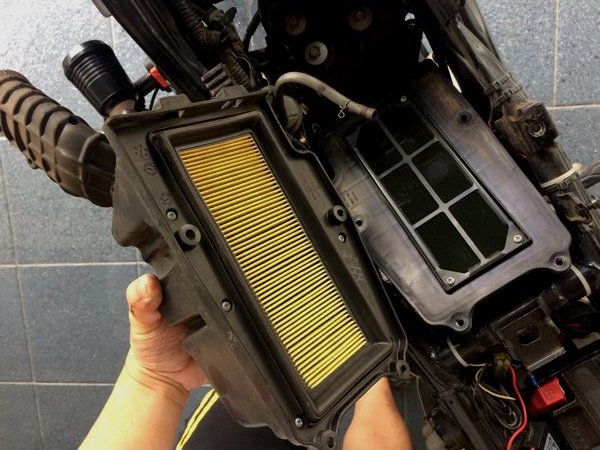
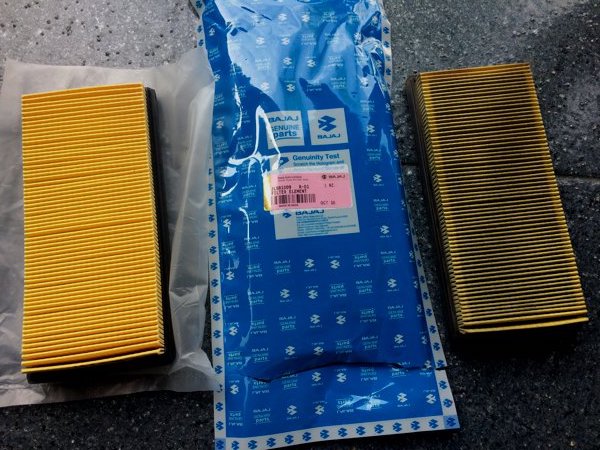
Remove the 4 bolts holding down the air filter housing cover.Lift up the air filter housing and you will see the air filter. Gently remove and replace the air filter – it’s held to the housing by friction only.New air filter (left) vs old air filter (approx 17,000km).Again, the OCD in me just wanna make sure I know where the removed bolts should go back to.
COOLANT REPLACEMENT
** VERY IMPORTANT!! Make sure that your motorcycle is already cooled! Hot coolant can scald and cause burn injuries!
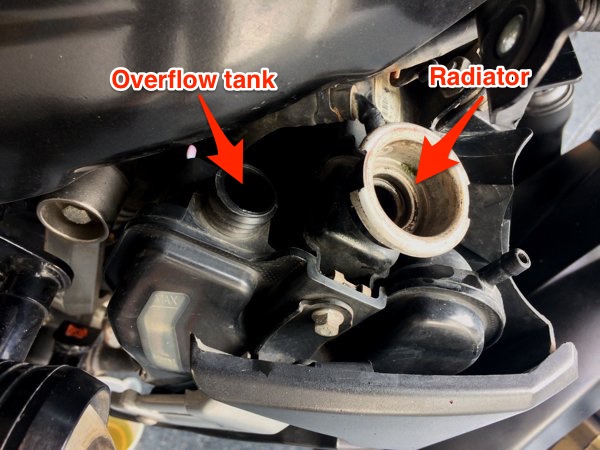
If you are ONLY going to replace the coolant, all you need to do is to remove the fuel tank cover to get access to the radiator cap and the coolant overflow tank cap. You DO NOT need to remove the fuel tank and/or air filter box. I’ve read reports of some owners who manage to access the radiator cap and coolant overflow tank cap without tank cover removal. It’s possible, but makes your job a lot harder. Plus, you risk scratching your tank cover paintwork.
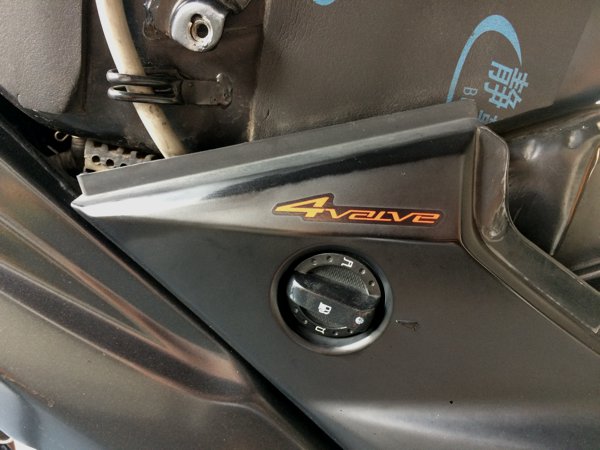
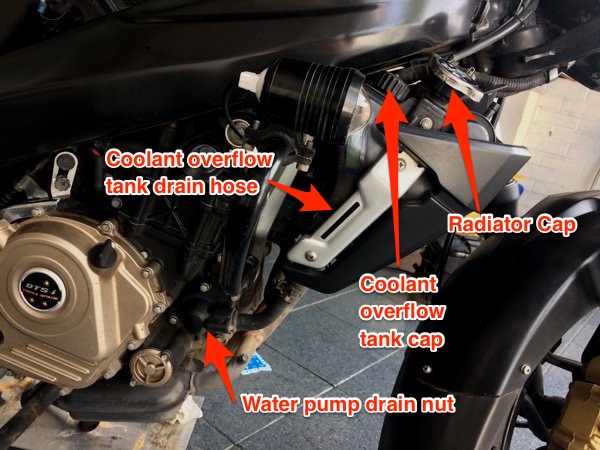
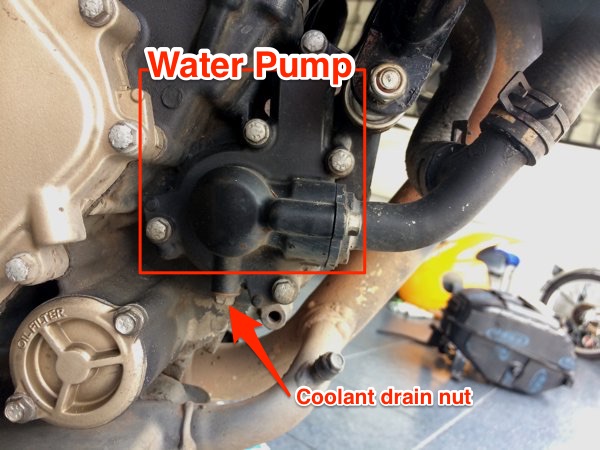
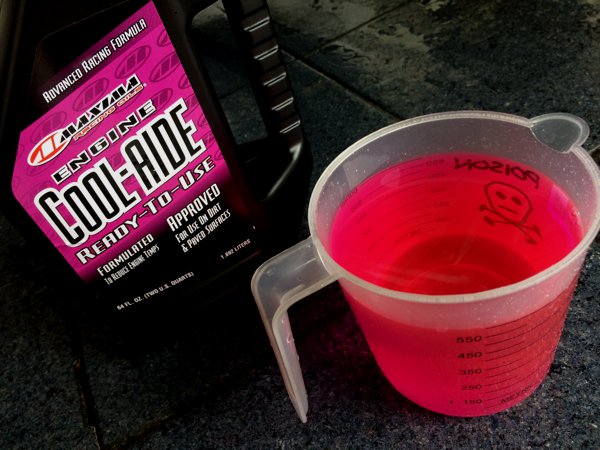
With the fuel tank cover removed, got to the RIGHT hand side of the motorcycle. You should see the radiator cap, the coolant overflow tank cap, overflow tank drain hose and the water pump.Remove the coolant drain nut and place a container underneath to catch the released coolant. The flow will be quite slow, and might eventually stop. Release the radiator cap to increase the flow rate of the coolant release as air is introduced into the radiator.The old coolant (approx 13,000km and 6-months old). This is Motul’s Motocool. I’m not sure if the color is supposed to be like that.Disconnect the coolant overflow tank drain hose to release the remaining coolant from the overflow tank.Prepare your new coolant. The owner’s manual indicate that 1L of coolant is required. But my personal experience suggests only approx 900ml to 950ml is required.Flush the radiator and coolant overflow tank with fresh water until there are no signs of old coolant. Then, with the water pump drain nut and overflow tank drain hose reconnected, fill the radiator and overflow tank with new coolant. Approximately 650ml goes into the radiator and 250ml into the overflow tank.
That’s it! Just put everything back in reversed order. But before you put back the fuel tank cover (last item to be restored), fire up the bike and let it run for a couple of minutes. This should test if you’ve put the fuel tank back correctly and also allow the new coolant to flow and possibly expel any air that’s trapped in the cooling system. You may have to top up the coolant a little after this – but make sure you only do that when the engine’s completely cooled! My personal experience suggests that this is not necessary. Because the coolant was previously filled to the brim of the overflow tank, this “extra coolant” will replace the removed air and the overflow tank coolant level will “drop” from “way above max” to somewhere between “min” and “max”.
SOME COMMON ROOKIE MISTAKES
Make sure that the fuel hoses are not pinched when putting the fuel tank back
Remember to reconnect the fuel level sensor connector.
After putting back the fuel tank cover, remember to reconnect the coolant overflow hose.
Check that the fuel petcock valve is turned ON before starting engine. I’ve left it in the OFF position before and wondered why the engine died after running for a few minutes.
The grommets of fuel tank cover front bolts on the bike frame drop out easily. So check and make sure they’re installed properly when putting back the fuel tank cover.
Remember to reconnect the coolant overflow tank drain hose before filling it up with new coolant.
After connecting everything back together, run the engine on idle for a couple of minutes. You may see some coolant overflowing – that’s perfectly normal if you’ve “overfilled” the coolant overflow tank to above the “MAX” mark.
33 thoughts on “Bajaj Pulsar 200NS DIY Maintenance Guide”
Hello im Ningma Tamang and I was just concerned about mobile leakage in the left side of my Pulsar 200ns its in the junction where the circuit wiring enter the main engine system so what would be the permanent solution to this problem. I guess this occurs only when I rev it hard like 100 Km/hr and above. Please help.
Hi Ningma Tamang. Although I have a suspicion that you’re mentioning the infamous magneto’s stator output wire seal oil leak, there is no way I could tell what’s leaking merely from your text description above. Pics would certainly help here. Drop me a private message on my contact page and we can take it offline?
Now, assuming it is indeed the stator output wire you’re referring to, then you can try to seal it from the outside with some sealant or tape with cable tie. Although I suspect the proper way is to check the seal on the inside – which require opening up of the magneto cover.
hey great blog with lots of good info. I have ridden my black 200ns for 7 months now and I have great experience with it. I took most of the stickers off (I like a simple discreet motorbike) and most people questioned what motorbike it is or either admire the bike (hahaha i love those stare from people). The engine and all the parts are good but I got this problem that even the mechanic have no solution to. Gear shifting sounds too loud, like a hard thump that even in the busy road, people would still hear it. I have tried shifting gear at the recommended RPM but still. Any solution for this issue? Thanks
Nice to know that you’re loving your 200ns so far!
As to your gearbox issue, the only thing I can think of is to replace your engine oil to something of a higher grade. Say, try Motul’s 300V (do you have this in Indonesia?) for a while and see if it helps. The 200ns uses a wet sump design and the engine oil lubricates the gearbox too.
If that still won’t work, then it’s probably time for a gearbox overhaul if it bothers you enough.
I followed your blog and managed to remove the tank and refill my coolant (THANK YOU).
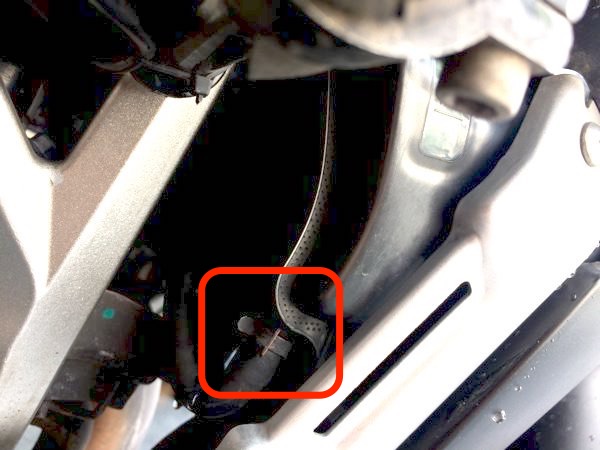
However, I noticed that Coolant overflow pipe (also known as the Drain pipe? ) goes from the radiator, wraps underneath the tank and then connected to ___?
Mine seems to be lose, the other end wasn’t connected to anything. Either it really wasn’t connected to anything or I force it out when I leaf the tank up.
In case, I confused you with the pipe name, I am referring to the Drain tube from this image.
Hi. My name is Notsi from Sasolburg RSA. By nature, I’m a DIY. I’d like to thank you for the info provided. I’ve bought my 200NS October 2016. I’d like to service it for 2000kilos. I have bought it brand new. I’d like to know where to find the service kit, the Mutol 300V oil.
Hi Notsi! I’m afraid I won’t be able to help with that as I’m only familiar with the supplier in Singapore! Try asking the shop that you purchased the bike from?
Hey buddy, its a great post for beginners, explained properly. To remove the tank you dont need to remove the tank cover, u just have to remove the 3 12 size bolts holding the main tank and the additional 10 size bolts in front. The whole tank and tank cover cab be removed so under 5 mins. Good post buddy, keep rockin.
Heya. Yes, I’m aware of this. And in fact, this is what the mechanics at the workshop would do too.
But in my newbie hands, I was afraid of inadvertently scratching the tank cover and would prefer to remove it before accessing the fuel tank. And because I’ve done it a few times already, it doesn’t take me too much additional time (probably 1-2mins more).
I am from Malaysia and riding a NS200 which has just clocked a mileage of 900km. I notice the coolant level in the spare tank beside radiator is dropping. I have done my 1st service at 750km and had to top up the coolant level. And now at 900km, it has again reduce slightly. And with the current level, i think i need to top up again at around 1500km.
While the reduction is not rampant, but is this normal? Or there should not be any reduction at all.
I suspect that what you are experiencing is what I witnessed on my bike too. When you top the coolant level to FULL, after running, the coolant level (at next cycle when the bike is completely cooled) drops to MID level.
If so, try NOT topping up and run the bike to see if the level drops further. If it maintains at the MID level, then there’s absolutely nothing wrong with the machine – you are not really losing coolant.
But however, if it continues to drop to MIN or below MIN, then you definitely have a leak somewhere. Get it checked.
Hey there. I own a ns200 and i have noticed a problem recently with my bike. Whenever i ride ns at 90kmph or more at 6th gear, when i release the throttle for few seconds and start throttling back again, my bike stops completely and it wont start. It behaves as if there is no fuel in the tank but actually there is more than reserve fuel that is there in it. But if i switch my bike off and turn it on and press the self start button, the bike comes back to life. It happens only at high speeds and 6th gear. What maybe the reason? Can someone help?
Could be a fueling issue. When was the last you serviced your carburetor? But then again, your best bet is to take it to a competent service centre and get the guys there to take a look. I would never rely on a keyboard mechanic for issues like this – you need to have physical access to the bike for a proper diagnosis.
Hi bro, it’s been 4 months I own a pulsar ns 200 bs4…I extremely love her but one thing I would like to know that if the coolant level is more than minimum is there any chance it could malfunction the engine?
Hello sgbikerboy I’m currently looking to buy a 200ns, however the fuel cap nuts are a bit rusty, as well as the fork and the tube(the top of the black portion of the fork?). Is there any cause for concern? Thanks!
Hey Man, in my NS whenever i ride it the coolant gushes out through the overflow hose and the overflow tank is empty. The radiator is full with coolant but overflow tank gets empty. Everytime I put coolant in it same thing happens. Please help.
Hello bro, been riding ns200 for about 4 months(second hand) and I enjoy it. I noticed that the coolant has not been depleting over time as of frequent use. Based upon the window, the amount of coolant is still on the max level.
Is this normal? Or is there a fault in the overall cooling system?
Hope you can give some insights. Thanks
I am facing a problem of decreasing of coolant very rapidly and but no visible leakage and no leakage inside the engine no visible change in color of engine oil.


Hello im Ningma Tamang and I was just concerned about mobile leakage in the left side of my Pulsar 200ns its in the junction where the circuit wiring enter the main engine system so what would be the permanent solution to this problem. I guess this occurs only when I rev it hard like 100 Km/hr and above. Please help.
Hi Ningma Tamang. Although I have a suspicion that you’re mentioning the infamous magneto’s stator output wire seal oil leak, there is no way I could tell what’s leaking merely from your text description above. Pics would certainly help here. Drop me a private message on my contact page and we can take it offline?
http://sgbikerboy.com/contact-sgbikerboy/
Now, assuming it is indeed the stator output wire you’re referring to, then you can try to seal it from the outside with some sealant or tape with cable tie. Although I suspect the proper way is to check the seal on the inside – which require opening up of the magneto cover.
hey great blog with lots of good info. I have ridden my black 200ns for 7 months now and I have great experience with it. I took most of the stickers off (I like a simple discreet motorbike) and most people questioned what motorbike it is or either admire the bike (hahaha i love those stare from people). The engine and all the parts are good but I got this problem that even the mechanic have no solution to. Gear shifting sounds too loud, like a hard thump that even in the busy road, people would still hear it. I have tried shifting gear at the recommended RPM but still. Any solution for this issue? Thanks
Nice to know that you’re loving your 200ns so far!
As to your gearbox issue, the only thing I can think of is to replace your engine oil to something of a higher grade. Say, try Motul’s 300V (do you have this in Indonesia?) for a while and see if it helps. The 200ns uses a wet sump design and the engine oil lubricates the gearbox too.
If that still won’t work, then it’s probably time for a gearbox overhaul if it bothers you enough.
Hey, I have got a question.
I followed your blog and managed to remove the tank and refill my coolant (THANK YOU).
However, I noticed that Coolant overflow pipe (also known as the Drain pipe? ) goes from the radiator, wraps underneath the tank and then connected to ___?
Mine seems to be lose, the other end wasn’t connected to anything. Either it really wasn’t connected to anything or I force it out when I leaf the tank up.
In case, I confused you with the pipe name, I am referring to the Drain tube from this image.
http://www.99rpm.com/media/catalog/product/cache/7/image/2a3c9457fd5037b7f08fc0a3a9f243a0/p/u/pulsar_200ns_radiator_1_1.jpg
That is correct – one end of the drain tube is hanging beneath the bike for coolant to escape when an overflow occurs.
Ahhh.. cool thanks.. Phew
Hi. My name is Notsi from Sasolburg RSA. By nature, I’m a DIY. I’d like to thank you for the info provided. I’ve bought my 200NS October 2016. I’d like to service it for 2000kilos. I have bought it brand new. I’d like to know where to find the service kit, the Mutol 300V oil.
Hi Notsi! I’m afraid I won’t be able to help with that as I’m only familiar with the supplier in Singapore! Try asking the shop that you purchased the bike from?
Hey buddy, its a great post for beginners, explained properly. To remove the tank you dont need to remove the tank cover, u just have to remove the 3 12 size bolts holding the main tank and the additional 10 size bolts in front. The whole tank and tank cover cab be removed so under 5 mins. Good post buddy, keep rockin.
Heya. Yes, I’m aware of this. And in fact, this is what the mechanics at the workshop would do too.
But in my newbie hands, I was afraid of inadvertently scratching the tank cover and would prefer to remove it before accessing the fuel tank. And because I’ve done it a few times already, it doesn’t take me too much additional time (probably 1-2mins more).
But yeah – thanks for the tip! 🙂
Hi Bro, the details above were very informative.
I am from Malaysia and riding a NS200 which has just clocked a mileage of 900km. I notice the coolant level in the spare tank beside radiator is dropping. I have done my 1st service at 750km and had to top up the coolant level. And now at 900km, it has again reduce slightly. And with the current level, i think i need to top up again at around 1500km.
While the reduction is not rampant, but is this normal? Or there should not be any reduction at all.
Thanks for your feedback bro.
Anand
I suspect that what you are experiencing is what I witnessed on my bike too. When you top the coolant level to FULL, after running, the coolant level (at next cycle when the bike is completely cooled) drops to MID level.
If so, try NOT topping up and run the bike to see if the level drops further. If it maintains at the MID level, then there’s absolutely nothing wrong with the machine – you are not really losing coolant.
But however, if it continues to drop to MIN or below MIN, then you definitely have a leak somewhere. Get it checked.
Thanks buddy. Would further monitor.
awesome blog…thinking of getting a Bajal 200cc / 150cc….quite informatic. Thank you for your detailed guide.
You’re most welcomed!
Hey there. I own a ns200 and i have noticed a problem recently with my bike. Whenever i ride ns at 90kmph or more at 6th gear, when i release the throttle for few seconds and start throttling back again, my bike stops completely and it wont start. It behaves as if there is no fuel in the tank but actually there is more than reserve fuel that is there in it. But if i switch my bike off and turn it on and press the self start button, the bike comes back to life. It happens only at high speeds and 6th gear. What maybe the reason? Can someone help?
Could be a fueling issue. When was the last you serviced your carburetor? But then again, your best bet is to take it to a competent service centre and get the guys there to take a look. I would never rely on a keyboard mechanic for issues like this – you need to have physical access to the bike for a proper diagnosis.
Hi bro, it’s been 4 months I own a pulsar ns 200 bs4…I extremely love her but one thing I would like to know that if the coolant level is more than minimum is there any chance it could malfunction the engine?
No – you won’t damage the engine. If you’ve overfilled the coolant, it will merely spill out via the vent / overflow hose when the bike is warmed.
Hello sgbikerboy I’m currently looking to buy a 200ns, however the fuel cap nuts are a bit rusty, as well as the fork and the tube(the top of the black portion of the fork?). Is there any cause for concern? Thanks!
Looks like they’re merely cosmetic issues, and I’d not be too bothered by it. If you’re up for it, you could also paint it over and it’ll look great again! I’ve done up the fuel lid on the 200NS too:
http://sgbikerboy.com/2016/12/03/weekend-project-restoring-the-fuel-lid/
Hi can guide me, ns200 first servicing what type of engine oil is suitable and im too confused on this
What does your manual say? You’d probably won’t go too wrong following what the engineers designed the engine to be run on.
Hey Man, in my NS whenever i ride it the coolant gushes out through the overflow hose and the overflow tank is empty. The radiator is full with coolant but overflow tank gets empty. Everytime I put coolant in it same thing happens. Please help.
Hello bro, been riding ns200 for about 4 months(second hand) and I enjoy it. I noticed that the coolant has not been depleting over time as of frequent use. Based upon the window, the amount of coolant is still on the max level.
Is this normal? Or is there a fault in the overall cooling system?
Hope you can give some insights. Thanks
It’s normal.
Can you please tell me is there any air pipe in coolant reservoir of ns200 bs4
I don’t believe so.
I am facing a problem of decreasing of coolant very rapidly and but no visible leakage and no leakage inside the engine no visible change in color of engine oil.
Get it professionally diagnosed. Possibly a pressure test on the cooling system.
Hello. May i know what’s the name of the black thing on the tank that you say for vibration absorber
Try searching these keywords – “Automotive sound insulation”, “sound deadening”, and “sound dampening mat”.