
Since I published the blog posts on my dead motorcycle battery, I have received a couple of queries asking me what I used to charge my lead acid battery and where I bought it from. And after I told them that I built it from some electronic scrap parts and it cost me close to nothing, they were surprised.
So, I’ve decided to write this post to share with you on how you can build your very own DIY home made battery charger for almost free – well, if you already have most of the parts like I did. And even if you don’t, you can probably get it quite cheaply from an electronics parts store such as those in Sim Lim Square.
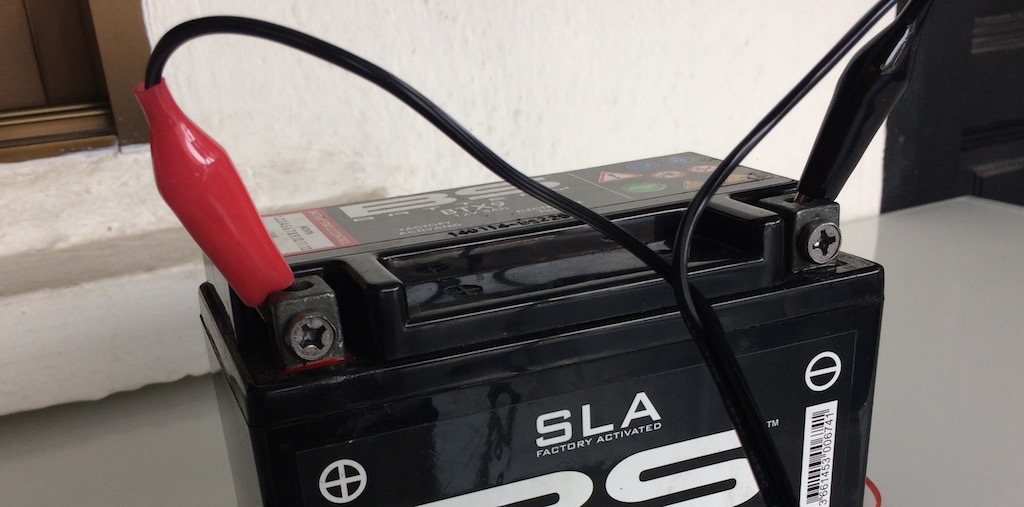
Ok, for starts, you need to know what the battery voltage is. Almost all motorcycle batteries run on 12V. I think most cars’ batteries too. 6V and 24V are less common. But just check to make sure. The easiest way to do this is to open up your service compartment of your motorcycle and just take a look at the label on the battery.
Here are the parts that you’ll need to build your charger:
- A 12v or 14v DC switching power supply. I have a spare one lying around and so it was free for me. More on this later.
- A voltmeter or multimeter. You don’t have to own this – you can borrow one if you wish. But I’d really recommend getting one.
- Wire cutter / wire stripper. Plain old scissors work fine here.
- A pair of crocodile clips – preferably one RED and one BLACK. Approximately $0.50 each from Sim Lim Tower.
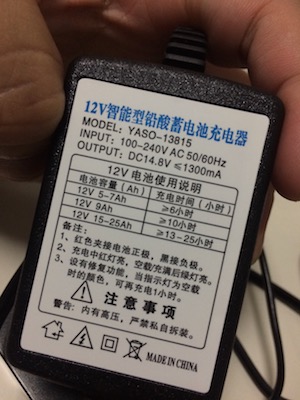
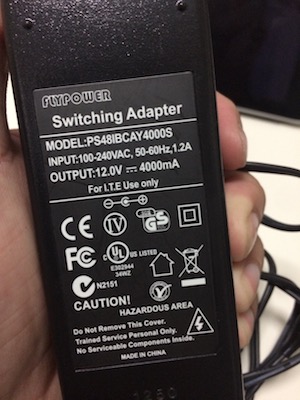
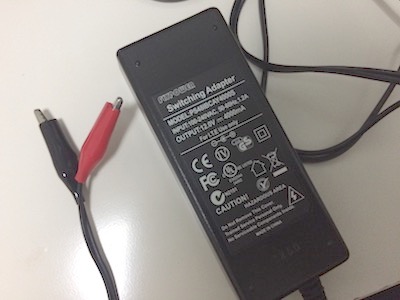
Let’s talk about the power supply first – this is the most important component. Many electronic devices come with a power supply adapter. Modern phones are charged using a USB power supply and these are 5Vdc – not sufficient to charge your motorcycle battery. Search for one that gives you 12V to 14V. Anything between that range should work fine. Make sure the output is DC (direct current) and not AC (alternating current). What you’ll need to look out for is the current output. Find something between 1A (or 1000mA) to about 5A (5000mA). Anything lesser than 1A and the battery will charge too slowly. Anything greater than 5A and the battery may be stressed and get too hot when charging.
How do you find out what specifications the charger is? Easy. Turn it on it’s back and read the label. It should indicate the output voltage and its max output current rating.
Next, what you’re going to do is to cut off the DC plug head of the power supply. The DC plug should look something like this:
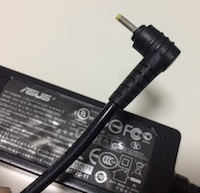
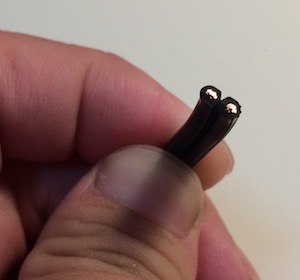
Once you have cut off the DC plug, you will see TWO exposed copper wire. One of this carries the DC voltage, and the other is ground. How do you tell? This is where the multimeter or voltmeter comes in. Making sure that you do not short the 2 wires, take the RED probe of the multimeter and connect it to 1 of the exposed copper wire and connect the BLACK probe to the other exposed wire. If the multimeter reads 12V to 14V, then the wire that the RED probe is connected to is the POSITIVE wire. If, however, the multimeter reads -12V to -14V, then the RED probe is connected to the NEGATIVE (or GROUND) and the wire connected to the BLACK probe is then POSITIVE.
Make sure you take note which wire is POSITIVE and which is NEGATIVE (or GROUND).
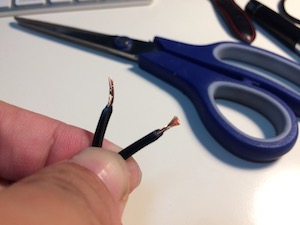 Next, what you’d want to do is to strip about 10mm or so if the wire ends to expose the copper wires. You can do this with a wire stripper, a pair of scissors or a pair of cutting pliers.
Then finally, connect the exposed wire ends to the crocodile clips – RED for POSITIVE, and BLACK for NEGATIVE (or GROUND).
Your end product should look something like this:
At this point, I’d do a final test with a multimeter to make sure that the RED crocodile clip is indeed POSITIVE and the BLACK connected to NEGATIVE.
And you’re done! So if you need to charge your lead acid battery, simply connect the RED to the battery’s POSITIVE terminal and the BLACK to the NEGATIVE terminal. Turn the charger on and your battery should be charging up.

What you’ll need to know:
This is a low-cost charging solution for your motorcycle battery. What it does is that it supplies a constant 12V to your battery until it gets charged. Battery chargers specifically built for recharging lead acid batteries are generally constant current devices – they charge faster. Constant voltage devices such as the DC power supply may charge the battery slower – especially at the tail end of the charging cycle.
Also, dedicated chargers typically have an auto-cutoff feature that either turns off the charger or goes into trickle charge mode when the battery is full. A DC power supply charger like the one above does not have an auto cutoff feature (somewhat). But what happens is this – the voltage of the battery rises as it’s being charged. And when it rises to be equal to that of the output voltage of the charger, charging effectively stops as no more current flows through the battery. So, it’s somewhat of an “auto-cutoff”.
I’m not too concerned with an “auto-cutoff” feature, as the charging circuits on almost all vehicles (apart from electric vehicles, that is) also supply a constant voltage to the battery when the engine is running and do not have auto-cutoff features. So that charge that the battery experiences from this “dumb” charger is no different from what it experiences on a motorcycle’s charging circuit. In fact, I might even say that the DC power supply’s output might even be “cleaner” or “smoother” that the motorcycle’s magneto-based charger which generally has lots of voltage ripples.
Due to the chemistry nature of lead acid batteries, sulphate crystals tend to build up in the battery over time. This leads to loss of cranking power and loss of battery capacity when it happens. Some dedicated lead acid battery chargers have a desulfation mode. What it does is that it sends electronic pulses through the battery, thus “loosening” up these sulphate crystals and somewhat reversing that process of sulfation. The DC power supply charger does not have this function.
Personally, I prefer to use a 12V DC power supply over a, say, 14V one. Yes, it will not “fully charge” the battery, but it also restricts the max voltage to 12V and therefore reduces the possibility of overcharging. However, do note that lead acid batteries are generally VERY resilient to overcharging and you shouldn’t experience too adverse effects on the battery even if you leave the charger connected to it overnight.
But as with charging of any batteries, please leave it in a well ventilated area and monitor the battery periodically during the charging process. If you spot anything unusual such as smoking, battery bulging, excessive heat, etc – STOP THE CHARGING IMMEDIATELY!
Whatever you do, just don’t end up creating news like the way Samsung did with their Note 7.
Happy DIY charging!
Hi my bike battery is 12v 4 amp. so shall i use a 12v and 5 amp battery charger to charge it? is there a problem if i do?
What type of charger is it? Is it a dedicated battery charger? Or is it a “dumb” DC power brick?
Thanks for the info…especially the “overflow” current info. I will build a trickle charger just like yours. But if I’m using a 12v telecom battery (not lead-acid) in my motorcycle, is that a problem? Thats what was in the bike when I got it.
Thanks again….TJ
I’m not overly familiar with telecom batteries. If it’s not lead-acid, what chemistry is it then? And why would you want to use a battery built specifically for telecom operations in a motorcycle?